加载中
加载中
表情图片
评为精选
鼓励
加载中...
文件下载
加载中...
2015 年德国的几位科研人员基于 google deep dream 的思路,提出了一种用 CNN自动生成带有特定艺术风格的图片的算法,发表了一篇名为A Neural Algorithm of Artistic Style的 tech notes, 可以说是 deep dream的美梦+艺术版本。
由于效果实在是太神奇,从那时起开始出现了很多利用此技术来美化用户图片的App和在线应用,比如手机应用 Prisma 和ostagram,以及deepart。
楼主在读过这篇 tech notes后,被其想法的巧妙所折服,再加上目前网络上开源的版本已经有了基于 Torch, Theano 和 Tensorflow 的,但尚无 caffe版本。 于是产生了用 caffe来重复原文实验的想法。
该文的一个基本思路是:一张图片的内容(content)和风格(style)是可分离和重组的。于是我们可以用图片A的内容,加上图片B的风格,组合出一张新的图片,使之同时具有二者的内容和风格。
而这里CNN的作用在于,当用CNN识别一张图片时,当图片数据沿着各 convolution layer前向(forward)传播时,其包含的信息将越来越趋于精简,图片中的细节部分,或者说基础纹理和边缘,将逐渐淡去,而这些正是所谓“艺术风格”的体现之处,大概相当于平常说的“笔触”吧;而代表主干内容的结构信息,则会越来越清晰。这是CNN对人类视觉中“分层理解”的工作方式的一种近似模仿。
所以实际中,CNN中的浅层 convolution layer,主要对细节纹理信息进行提取,而这些 layer经过 activation layer 之后的输出,经过处理后,表征了一幅图片的 style 信息;而较深层次的convolution layer,则表征了图片的 content 信息。
具体的实现思路如下:
1. Find Content
基于上述思路,文中首先定义了用于度量一副图片在某一特定 layer
然后的问题就是要如何找到这张图片?考虑到图片的像素数和灰度级,这里的搜索空间是极其极其巨大的。但我们有 gradient descent 这一法宝在手,可助降妖伏魔。
解决的方法也非常鬼畜: 首先对 x 生成一张白噪声图片,作为初始值,然后用 gradient descent 和 backpropagation,在每一次迭代循环中计算
基于上述理论,楼主编写了如下基于 caffe的实验代码,待我一行行分析:
这一段是设置 caffe相关的环境,为省事直接copy了之前 deep dream的部分。
Python# imports and basic notebook setup
from cStringIO import StringIO
import numpy as np
import scipy.ndimage as nd
import PIL.Image
from IPython.display import clear_output, Image, display
from google.protobuf import text_format
import matplotlib.pyplot as plt
from numpy import linalg as LA
%matplotlib inline
import caffe
# If your GPU supports CUDA and Caffe was built with CUDA support,
# uncomment the following to run Caffe operations on the GPU.
caffe.set_mode_gpu()
caffe.set_device(0) # select GPU device if multiple devices exist
def showarray(a, fmt='jpeg'):
a = np.uint8(np.clip(a, 0, 255))
f = StringIO()
PIL.Image.fromarray(a).save(f, fmt)
display(Image(data=f.getvalue()))
根据原文,导入已经 train好的 VGG19模型
Othermodel_path = '/home/lzhang57/DeepLearning/caffe/models/bvlc_vgg19/' # substitute your path here
net_fn = model_path + 'VGG_ILSVRC_19_layers_deploy.prototxt'
param_fn = model_path + 'VGG_ILSVRC_19_layers.caffemodel'
# Patching model to be able to compute gradients.
# Note that you can also manually add "force_backward: true" line to "deploy.prototxt".
model = caffe.io.caffe_pb2.NetParameter()
text_format.Merge(open(net_fn).read(), model)
model.force_backward = True
open('tmp.prototxt', 'w').write(str(model))
net = caffe.Classifier('tmp.prototxt', param_fn,
mean = np.float32([104.0, 116.0, 122.0]), # ImageNet mean, training set dependent
channel_swap = (2,1,0)) # the reference model has channels in BGR order instead of RGB
# a couple of utility functions for converting to and from Caffe's input image layout
def preprocess(net, img):
return np.float32(np.rollaxis(img, 2)[::-1]) - net.transformer.mean['data']
def deprocess(net, img):
return np.dstack((img + net.transformer.mean['data'])[::-1])
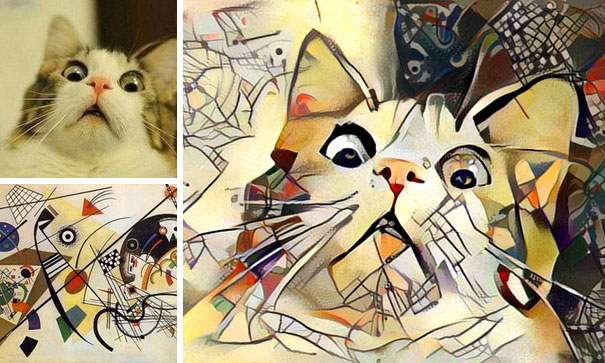
读取 content 图片,一只萌猫。并指定用于计算 content feature的参考 layer,这里先设置成 'conv4_2'

Otherimg = np.float32(PIL.Image.open('data/cat.jpg'))
[h,w,c]=img.shape
content_img=preprocess(net, img)
### set stop layer ###
end='conv4_2'
src = net.blobs['data']
src.reshape(1,3,h,w)
dst = net.blobs[end]
### generate content image ###
src.data[0]=content_img
net.forward(end=end)
Content=np.copy(dst.data[0])
生成白噪声图片,并进入 gradient descent 主循环。
Other### generate style image
target=np.float32(np.random.rand(h,w,3)*255)
target_img=preprocess(net, target)
### gradient descent step
step=2
src.data[0]=target_img
### optimize target image
Loss=[];
max_iter=500
for iter in range(max_iter):
## compute feature
net.forward(end=end)
Feature=dst.data[0]
## compute gradient
tmp=Feature[:]-Content[:];
Loss.append(0.5*LA.norm(Feature-Content))
if( iter>0 and np.abs((Loss[-2]-Loss[-1])/Loss[-2])
最后得到的输出图片如下,现在看来还平淡无奇,因为这里只是实现了“生成一张跟参考图片具有相同内容图片”的功能:


为了更好的演示这个过程中发生了什么,这里我将 gradient descent时的中间结果显示如下(成功规避水印):

在我研究 machine learning以前,如果有人告诉我可以像这样把一张白噪声图片只靠做减法,一点一点撸出一只猫来,我是打死也不信的。
今天就做这么多吧,实际上这里只实现了全部功能的 1/3,明天继续,睡觉zzz
更新计划:明天七夕,后天再继续
[修改于 8年10个月前 - 2016/08/09 12:19:59]