Gauss
Machine Gun高斯机关木仓-一个问题,不用电容储能也能做磁阻加速么
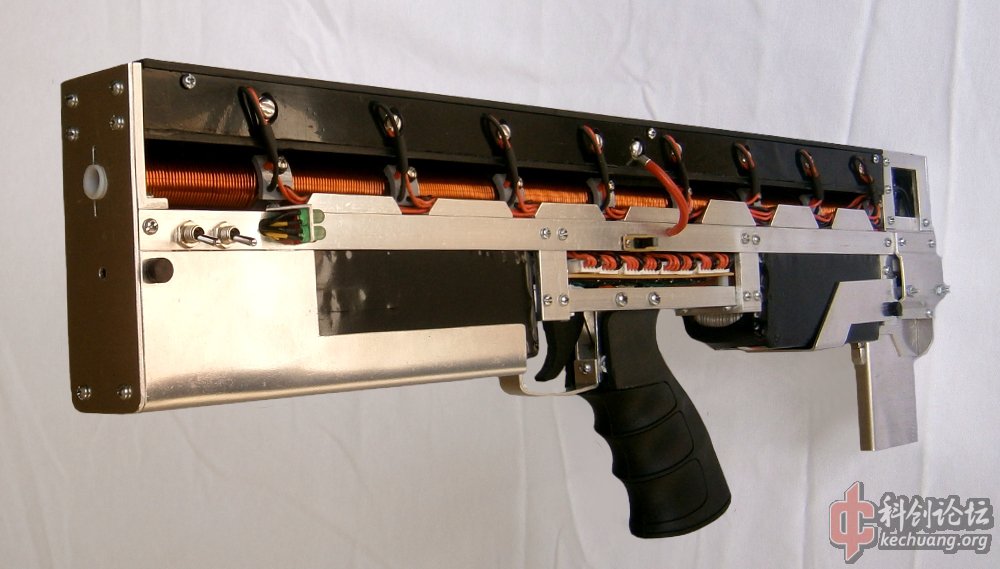
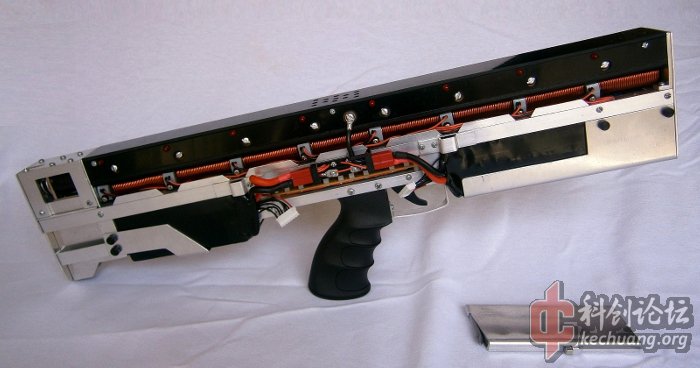
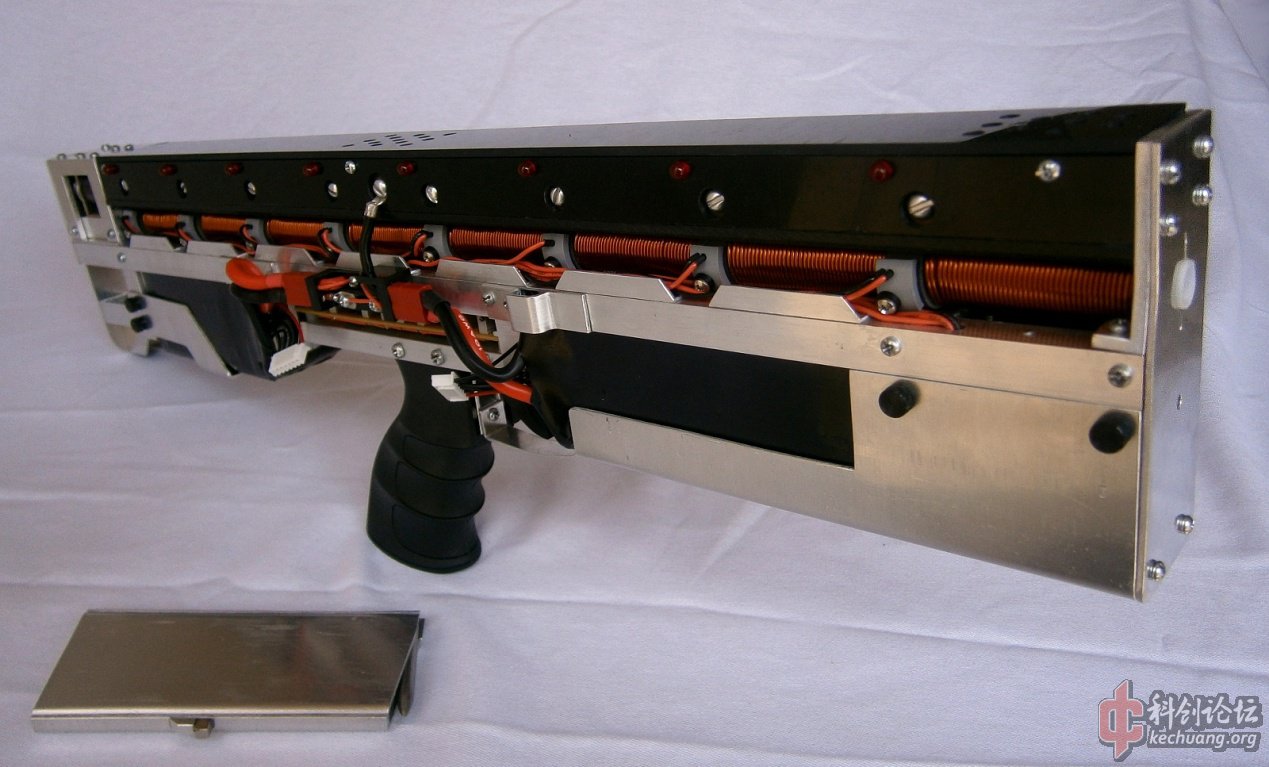
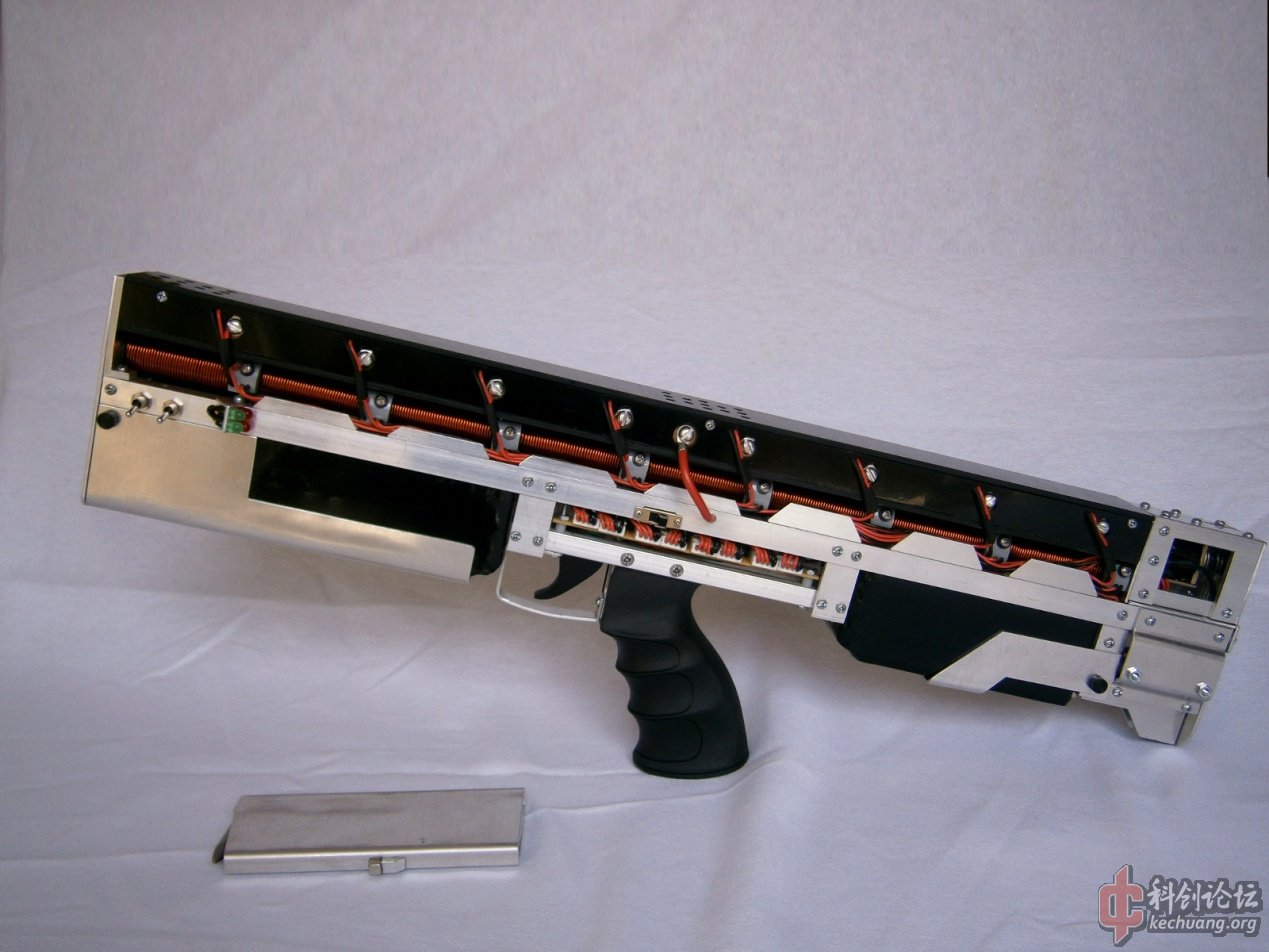
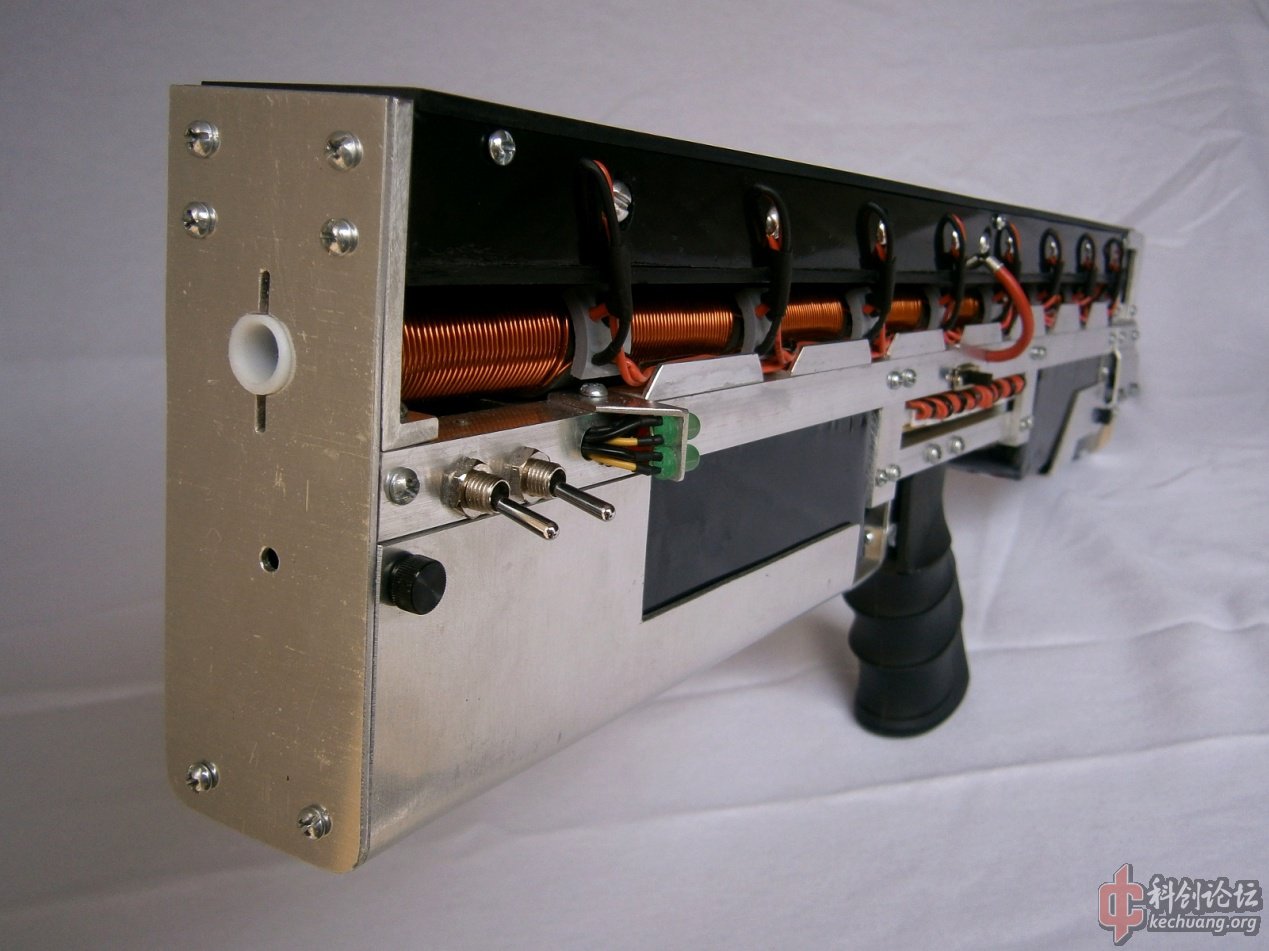
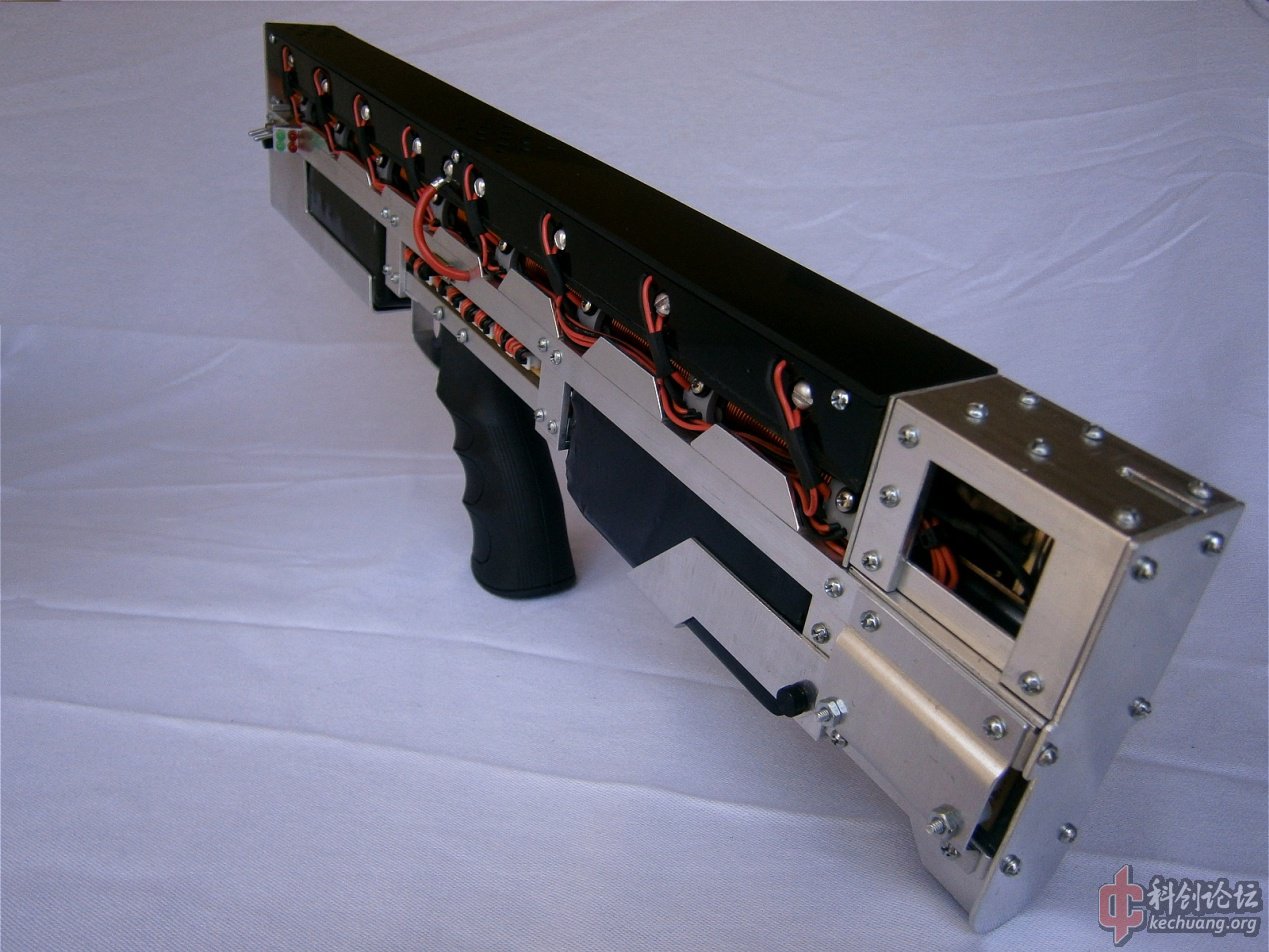
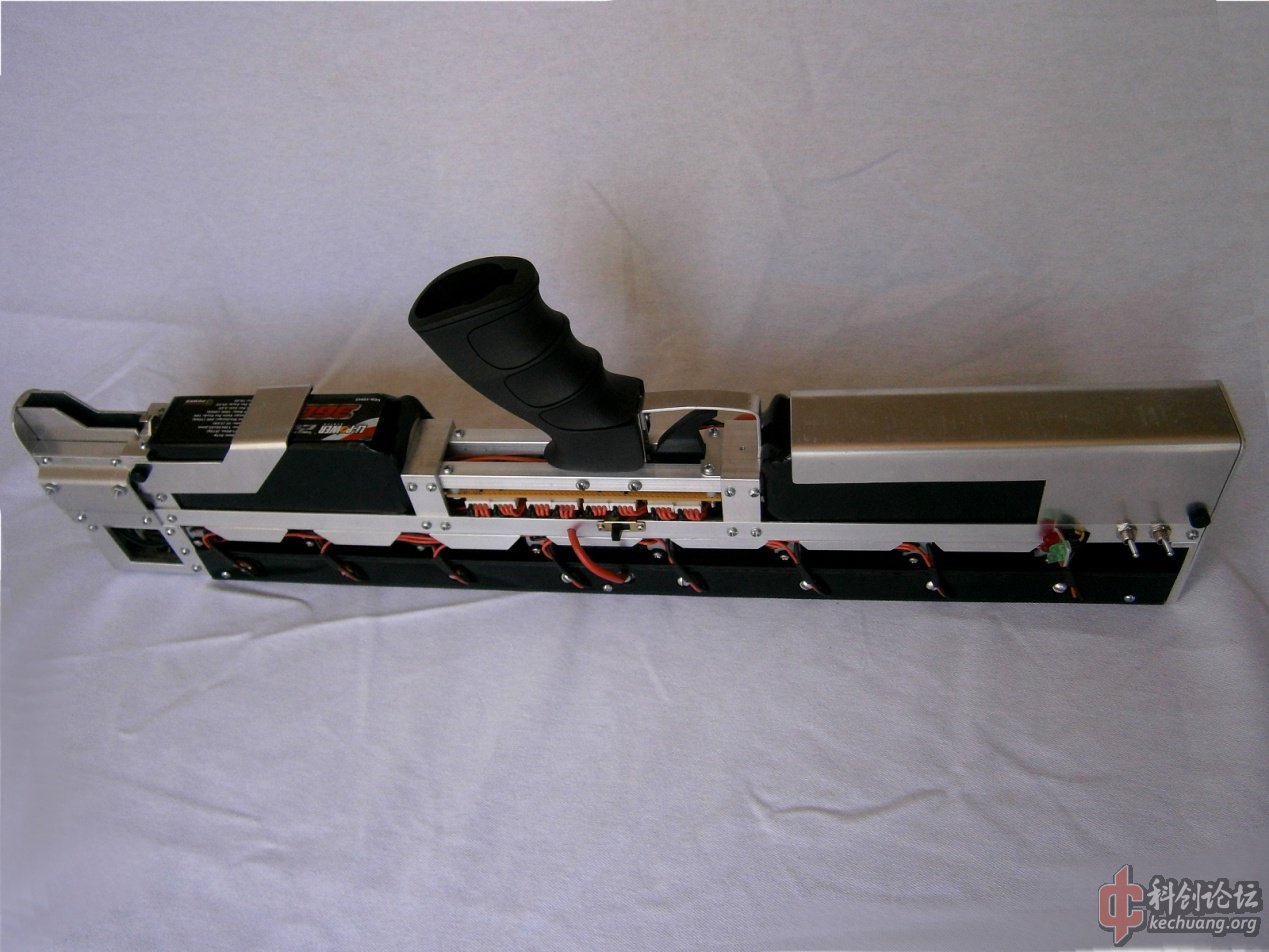
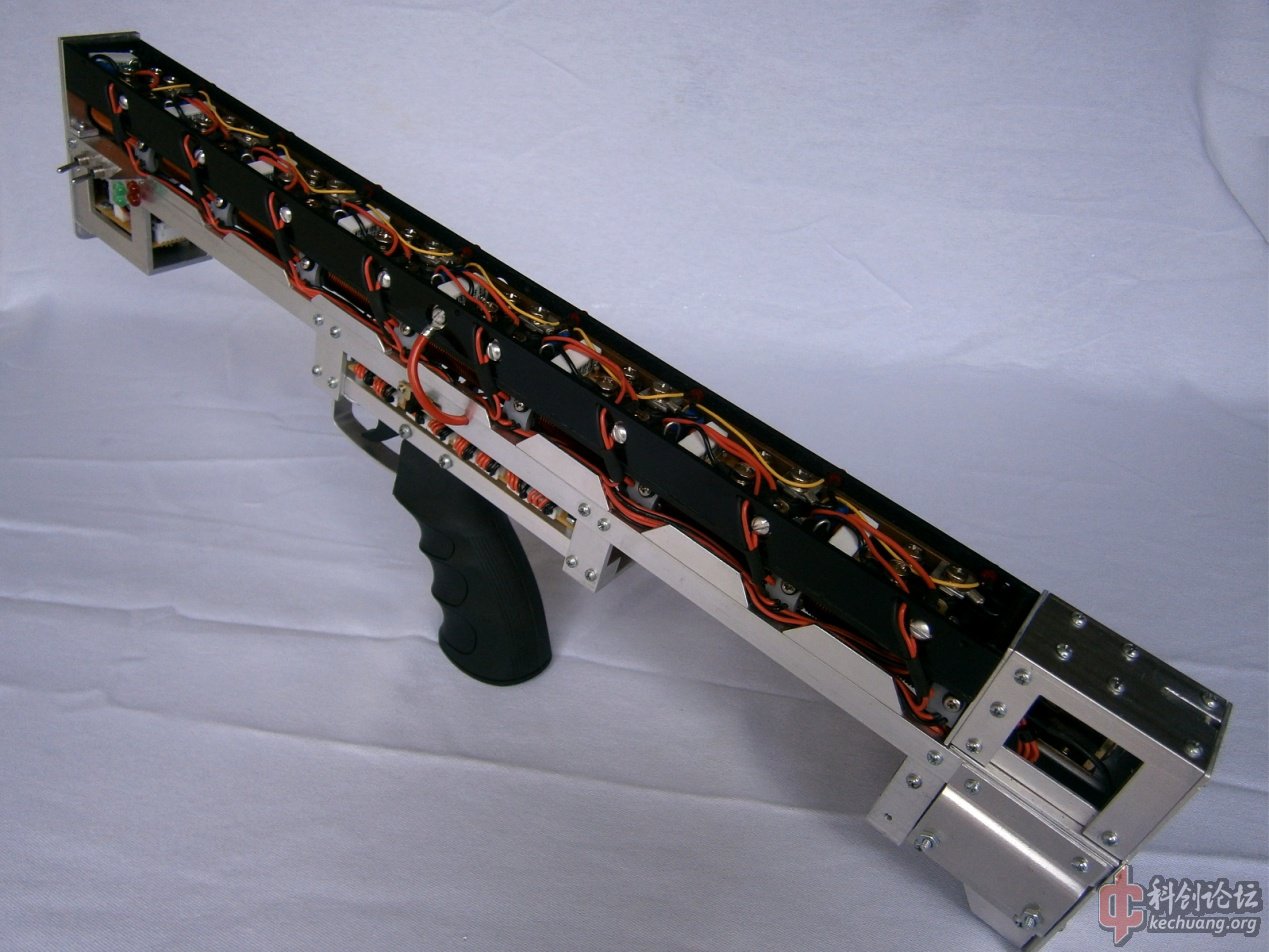
The “CG-42″ Gauss Machine Gun is an eight-stage, full-auto coilgun.
“CG-42
”高斯机枪是一把8
级的全自动电磁枪| | |
| Power Source: | 2x 22.2V, 3600mAh, 50C
Li-Polymer Battery Packs |
| Switching: | IGBT |
| Weight: | 4.17kg |
| Projectiles: | 6.5x50mm Caseless Steel
Slugs |
| Capacity: | 15 Rounds |
| Rate of Fire: | 7.7 Rounds/Sec |
| Muzzle (炮口)Velocity: | 42.03m/s |
| Muzzle Energy: | 10.78J |
| Total Efficiency: | 7.0% |
动力源:2组22.2v,3600毫安时,50C锂聚合物电池组
控制开关:IGBT
重量:4.17kg
弹丸:直径6.5mm,长50mm铁柱
弹夹容量:15发
射速:7.7发/秒
出口速度:42.03米/秒
出口动能:10.78焦耳
能量效率7.0%
Design
First
Attempt
The
full-auto coilgun project started in November 2010, and the initial design was
a high-voltage, single stage, capacitor driven coilgun I called the
CG-41. I hoped to achieve a muzzle energy of about 7.5 Joules with a Rate
of Fire (ROF) of 4 Rounds Per Second (RPS). However, the design
disintegrated around the charging circuit, which was a monstrous 2.5kW DC-AC
inverter(变流器) meant
to power appliances from a car battery. The inverter was gigantic, heavy,
and had a number of electrical issues that prevented it from being readily
integrated into the coilgun design. As the design exploded in size and
complexity to accommodate the charging circuit while still failing to work
properly, it had to be abandoned during the testing phase in June 2011.二、设计
1、设计初衷
全自动电磁线圈枪项目起始于2010年11月,最初设计是单级高电压,电容驱动的CG-41,我希望它能达到出口动能7.5焦耳,射速4发/秒。然而这个计划终止了,因为需要一个提供2.5千瓦功率的,实现汽车用电池电源的DC-AC转换装置。这个装置体积巨大,安装复杂,不便实现单人携带,于2011年6月终止了。
![image011.png]()
Understanding Coilgun Physics
The CG-41 was a
brute-force attempt at designing a full-auto coilgun. It was essentially
a scaled-up version of the CG-33, which was a limited design to begin
with. I decided to start over from scratch, and rebuild my gun based on
an understanding of physics rather than linear thinking. This second
iteration would be called the CG-42.
A coilgun is a linear motor.
Electronics hobbyist James Paul has developed a great mathematical model of a
basic linear motor on his websiteCoilgun Systems.
Please read about his model here.
A key conclusion drawn from the model is that coils become more efficient as
projectile speed increases. This
conclusion rules out(排除了) a
single-stage coilgun as a good design because full power is dumped up front
when the projectile is still moving slowly. A much better design uses
multiple, lower power coils to distribute the acceleration over a longer
distance so less energy is wasted during the initial slower portion of the
acceleration. As the projectile speeds up, subsequent coils become
increasingly efficient so adding more coils and lengthening the gun improves
efficiency and increases muzzle energy. That means an efficient, powerful
coilgun will be long and have as many stages as possible.
Also,
large currents are not needed to produce this more gradual acceleration.
This is good for a full-auto coilgun, because it eliminates the need for
capacitors, charging circuitry, and their slow recharge times and power
losses. There is a lot more to understand about coilgun physics, but this
bit of knowledge can already seriously improve the design. 2、深入理解电磁线圈枪
CG-41的目的是想实现全自动射击,它看来就想是一个放大版的CG-33,然而CG-33有着先天的不足。我决定重新理解电磁线圈枪的物理原理,摆脱线性思维的限制,重新设计,我称之为CG-42。
电磁线圈枪就是一个线性电机,电子爱好者James Paul已经为它建立了一个很好的数学模型。从这个模型中得出的关键结论就是线圈的效率随着弹丸速度的提高而提高。这个结论就决定单级电磁线圈枪不可能是一个好的设计方案,因为当所有的能量都从前端泻出时,弹丸的速度还很慢。更好的设计是使用多级加速、将相对较低的能量分布在加速器上较长的距离上,这样就能降低在最初的慢速加速过程中消耗能量的比率。随着弹丸速度的增加,后续的线圈效率开始增加,更多的线圈和更长的加速距离能够提升能量使用效率和弹丸动能。这就是说高效能的电磁线圈武器必须有足够的距离和尽可能多的加速级。
由此可知,大电流在渐进加速中是不必要的。这对设计全自动电磁线圈武器来说是好事,这样就可以避开大电容,高功率充电电路,较长的充电时间以及能量损耗等弊端。虽然这里面还有很多关于电磁线圈的物理知识,但是理解了这一小点,就可以大大的改进设计了。
Requirements
The first step is to decide what I want my
coilgun to accomplish. The design process should then focus on meeting
these requirements in the simplest, most direct manner possible.1. Smashing
Power: Muzzle energy of at least 10J
2. Full-Auto: At
least 10 RPS
3. Portable: Length
less than 58cm (length of CG-33)
4. Maintainable: All
parts accessible for repair or replacement
5. Cool
Looking: No
tape, cardboard, wood, or colorful plastic used in construction
要求:
第一步是要明确我的电磁枪要达到的设计指标。设计的过程就是找到尽量简单直接的方案来达成设计要求。
1、出口动能:最小10焦耳
2、全自动射击:最小射速10发/秒
3、长度:小于58厘米
4、可维护性:所有模块可拆卸维护
5、外观够酷,不适用胶带,彩色塑料,卡纸,木头
The
Maths
数学计算
Typically, coilgunners start their design
by multiplying the capacitor energy equation by a predicted efficiency factor η
to see how much stored energy they will need to produce muzzle energy E.
一般来说,电磁炮爱好者从设置一个效率系数η,用η乘以电容能量公式来得到出口能量
![image012.png]()
However, since this gun won’t use
capacitors, that won’t work. By using nothing but three simple kinematic
equations, an equally dumb but equally useful back-of-the envelope muzzle
energy equation can be derived for a battery driven coilgun.
假设电磁炮不用电容,用三个简单的力学公式,用简化理想状态处理,由电池驱动电磁枪
![image013.png]()
![image014.png]()
![image015.png]()
Where t is time and d is distance over which average power P
is required to accelerate a projectile of mass m from initial velocity vi to final velocityvf.
Note that equation 3 assumes constant acceleration, which is a close
approximation with a highly multi-staged coilgun. Begin by eliminating t by feeding equation 3 into
equation 2 and re-arranging to solve for Et是时间,d是加速距离,P是平均功率,m是质量,vi是初速vf是最终速度,
![image016.png]()
![image017.png]()
![image018.png]()
The
most frequent comment I get on my coilguns is that I should use a lighter
projectile to improve performance. This equations shows why that
suggestion is wrong. It’s counter-intuitive, but for a fixed power and
distance (e.g. fixed capacitor bank and coil), a lighter projectile will gain lessmuzzle energy
than a heavier one. This equation will now be used to guide the design
process.
按照一般经验,应该用较轻的弹丸质量来提升效果,这个公式表明这种想法是错的,这虽然反常识的,但能量和距离(电容量、线圈等)都固定时轻的弹丸得到的能量更低。这个结论会指导设计。
Projectile
弹丸
Every
part of a coilgun, from the power supply to the coils, is designed based on the
properties of the projectile. First I need to decide what muzzle velocity
I want. I’d like the CG-42 to shoot at least as fast as the CG-33, which
has a muzzle velocity of 40m/s. With my 10J muzzle energy requirement and
equation 1, that means the projectile should have a mass of 12.5g. Steel
nails make great projectiles since they’re cheep, quick to machine, and have
decent magnetic properties. I happened to have a pile of 6.5mm diameter
nails left over from a home improvement project. If I cut them to 50mm
lengths and sharpen them down, they come out to 12.3g which is close enough!
电磁枪上每一个部件的设计,从电源到线圈,都是以弹丸的特性参数为设计基础的。首先我得确定出口速度,至少40m/s,将出口动能10焦耳带入(1)式,得到弹丸要12.5克重,钢钉因为便宜好加工和很好的磁特性是理想的弹丸材料,我正好有家庭装修剩下的一对6.5mm直径的铁钉,切成50mm长削尖,重量为12.3克。
language:ZH-CN;mso-bidi-language:AR-SA'>vf
是最终速度,
![image019.jpg]()
Number of
Coils
线圈的数量
To get the best possible efficiency, I
want to chose the longest possible acceleration distance and divide this length
into as many coils as possible. This reduces the power needed to reach
the required muzzle energy. Balancing this is the fact that each stage
must be accompanied by a set of switching hardware and circuitry, which quickly
becomes expensive and difficult to fit inside a portable design when the number
of stages becomes too high. Based on the length of my projectile and the
maximum length requirement of the gun, I found that 8 stages could be
practically fitted into the design.
为了达到最好的效率,我要选择尽可能长的加速距离,并分割成尽量多的线圈。这降低了电源的要求。如果级数太多,成本和安装到有限空间的难度会大幅增加,应为每级还要配合开关和电路。根据总长度,最终定为8级。
Batteries
电池
The next thing to choose is the
batteries. I begin by re-arranging equation 6 above to solve for the
coilgun’s power requirement.
![image020.png]()
I
already have E and m from the previous steps.
For the eight 50mm coils and an equally sized 50mm projectile, this results in d=8x0.05m=0.4m.
Thus, the projectile will need to be
supplied with about 500 Watts to
meet the muzzle energy requirement.
将(6)式变化,E、m、d都确定了,得出电源功率500瓦。
Next, I
need to guess the total (battery to projectile) efficiency of my coilgun.
Based on other multi-staged, battery-driven coilguns, I might hope for an
overall efficiency between 6 and 10%. That means thatthe batteries must be able to
supply somewhere between 5,000 and 8,300 Watts.
接下来需要猜一下电磁炮总效率,参考其他多级电池驱动电磁枪,我定总效率为6%至10%,电池功率需要5000至8300瓦。
When it comes to portable batteries,
Lithium Polymer (LiPo) cells are at the forefront of technology (at least in
terms of what a hobbyist can afford). LiPo cells come with burst-current
ratings of up to 100C (100 times capacity in amp-hours) in packs with up to six
cells in series (6S) having a maximum voltage of 25.2V. These battery
packs are available with capacities of 2500mAh, 3600mAh, and 5000mAh. Any
of these battery choices meet the power requirements with good margin.
对于便携式电池,锂离子电池是技术前沿,至少爱好者能买起,他能达到100C放电速率,6单元电池组做到25.2V,容量为2500mAh、3600mAh、5000mAh。
For efficient transmission of power to the
projectile, the coils must maximize magnetic force exerted on the
projectile. Force on the projectile is proportional to coil current
multiplied by turns of wire, so the batteries must have high enough voltage to
push lots of current through a coil with many of turns of wire. For this
reason, I chose to use two 6S batteries in series for a total of 50.4V. I
settled on 3600mAh packs in order to ensure that plenty of power was available
to the coils and that lots of shots can be fired before the batteries need to
be recharged.
选用了6组电池共50.4V,我用3600mAh容量的单元。
![image021.jpg]()
Switches
开关
The
capabilities of the switch will determine the maximum current the coils must be
designed to draw. Since this design will use the same coil for each stage
(see coil section) each stage can also use the same switch. For this
design, an SCR will not work since SCRs require the current to fall to zero in
order to switch off, which won’t happen with batteries. I had several
IGBTs left over from the CG-41 which should work nicely. They can pass
current pulses up to 300A, and come in a compact ISOTOP package with screw
terminals which make them easy to attach to bus bars and low gauge wires.
放电开关的能力决定了励磁线圈的最大电流。本设计中每级线圈的规格是相同的,所以各级可以使用相同的开关。从设计要求来看,可控硅不能胜任,因为可控硅不能关断,直到电流为零,因为通着电池,电流不可能为零。我有一些CG-41剩下的IGBT(绝缘栅双极型晶体管)可以胜任,可以经受住300A的电流脉冲,而且他的封装也很适合安装。
![image022.jpg]()
Now
the various losses must be considered to ensure that enough power will be
delivered to the coils. I estimated that the batteries and
interconnecting wires will add about 40mΩ of resistance in series with the
coils. Additionally, the IGBTs will dissipate about 900W when they
conduct a full 300A. That leaves P = (300A*50.4V – 0.004Ω*300A^2 – 900W)
= 10,620W still delivered to the coils. This satisfies the 5,000-8,300W
power estimate with a good margin to allow for any variations.
Lastly,
note that MOSFETs with the same current rating would operate with about half
the power loss of these IGBTs, but the higher voltage rating of the IGBTs will
allow me to turn the coils off more quickly, reducing the “suck-back” effect
and improving efficiency (see voltage suppression section).
接下来,为了保证足够的功率,就要考虑几种情况下的能量损耗了。我估计电池组及线路会给线圈增加40毫欧的电阻,所有IGBT模块在通过300A电流时,会产生900瓦功率散耗。这样一来能够传送到线圈上的功率为:P
= (300A*50.4V – 0.004Ω*300A^2 – 900W) = 10,620W ,满足了设计指标中5000-8300W的功率要求。
虽然使用MOSFETs(场效应管)可以比IGBT减少一半的能量损失,但更高耐压等级的IGBT可以更快的关断,可以降低线圈的“回拉”效应。
Barrel
枪管
For a coilgun, the main purpose of the
barrel is to protect the inside of the coils from being damaged by the
projectile as it’s pulled through. The main criteria for choosing the
barrel is that it should fit the projectile closely and have the thinnest walls
possible. When the coilgun is energized, the projectile and coil are linked as
a magnetic circuit. Any space between the projectile and coil occupied by
non-magnetic material acts like a fat resistor on that circuit and limits
transmission of power from coil to projectile. Thus a thin, tight barrel
reduces the amount of plastic and air between the coil and projectile and
improves efficiency. A metal barrel is ideal because of its thin walls, but the
energized coils will generate eddy currents in the metal material due to its
conductivity. The power wasted in these eddy currents can be significant
and detract from the coilgun’s efficiency. Cutting a length-wise slot
down the barrel can mitigate eddy currents, but I don’t have the tooling to
accomplish this. For the barrel of the CG-42, I chose a low-friction
Teflon tube that fit the projectile nicely.
对于电磁枪来说,枪管的首要作用是保护线圈的内部不被他所加速的弹丸破坏。选择枪管最主要的指标是要与弹丸尺寸配套,并且管壁越薄越好。当电磁枪激发的时候,线圈与弹丸形成了电磁回路,在线圈与弹丸之间任何的不具导磁性的物质,像是给这个回路增加了一个巨大的电阻,限制了从线圈到弹丸的功率传递效率。所以,薄的结实的枪管,减少了线圈与弹丸之间的塑料和空气,提升了功率传递效率。因为比较薄,所以金属枪管比较理想,但是通电线圈会在电导率较高的金属材质中产生电流涡流,电流涡流对能量的浪费很显著,大大降低电磁线圈的效率。在管壁开一条等长的缝可以降低电流涡流,但我没有合适的开缝工具。所以,我为CG-42选了一根口径紧贴弹丸的低摩擦力特氟龙管。
Coils
线圈
For
an actively triggered coilgun like this one (see coil triggering) the
inductance of each coil stage does not need to vary to account for the
increasing speed of the projectile, so each stage can use the same coil
design. The physical dimensions of the coil are already dictated by the
dimensions of the projectile and a maximum outer radius I set to limit the
physical size of the gun. I then designed a coil that would fit within
that space while having as many turns of wire as possible to maximize magnetic
force and draw a peak current of 300 Amps from the batteries. I chose to
use low-gauge copper magnet wire, which minimizes resistivity and wasted space
within the coil dimensions.
对于这支连发的电磁枪而言,每一级线圈的电磁场强度度需要随着弹丸速度的增加而变化,所以每一级可以设计相同的线圈。线圈的物理尺寸参数已经被弹丸的尺寸及我所设定的枪的外径所决定了。所以我本着在有限的空间里尽量多的匝数和能耐受300A峰值电流的原则,选择了低标号、低阻、体积合适的铜磁线线圈。
![image023.jpg]()
Voltage Suppression
电压抑制
The
coil is an inductor, and an inductor stores energy in its magnetic field.
When an inductor is removed from its power supply, the inductor uses its stored
energy to generate a voltage that tries to keep the current flowing. If I
were to simply switch off the coils at the appropriate time, the coil
inductance would generate a voltage spike that could easily exceed the maximum
voltage rating of the IGBTs and destroy them. The solution is to
suppress the voltage spike by giving the inductor energy somewhere else to
go. This is commonly done by placing a diode anti-parallel to the
coil. When the IGBT shuts off the current, the diode begins to conduct
and allows the current to circulate in the coil where it decays and dissipates
as heat. This switch-off current must dissipate quickly; any current
remaining in the coil after the projectile passes the center point will slow
the projectile down. The time it takes to to dissipate this current can
be significantly reduced by adding a resistor in series with the diode.
Each coil in the CG-42 uses a rectifier diode with a high surge current rating
and a high-power resistor to quickly dissipate coil switch-off currents.
线圈是个电感器,电感器在他的电场中储能。当一个电感被切断电源的时候,电感就会利用自身存储的能量产生一个电压来维持原来的电流。如果在要关断的时候我只是简单的关断线圈,电感线圈会产生一个电压峰值,很容易就超出了IGBT的承受范围并击毁IGBT。解决的方法就是把电感的能量引向别处从而抑制这个峰值电压。这个通常的解决方法就是给线圈反向并联一个二极管。当IGBT关断电流,这个二极管就导通,让电流在线圈中形成回路从而消减最终转换为热能。这个关断电流必须快速消减,在弹丸通过线圈中点之后,任何剩余在线圈内的电流,会反拉弹丸。与二极管串联一组电阻可以有效的降低这个电流的消减时间。CG-42的每个线圈都使用了一个耐高压的整流二极管和耐高压电阻,用来迅速消减关断电流。
Magnetic
Flux Augmentation
磁性熔铸添加剂
Flux augmentation
is the practice of encasing the coils within some magnetic material in order to
reduce the reluctance of the magnetic circuit and improve the magnetic linkage
between the projectile and coil. Research suggests that
ferrous end caps can give a significant performance boost to low power coils
such as the ones I’m planning to build. Higher power coilguns can
saturate the end cap’s finite ability to be magnetized, making the efficiency
boost less significant.
熔铸添加剂的作用是把线圈用一种磁性材料两头包起来,用来降低电磁回路中的磁阻,增强线圈和弹丸之间的磁场。研究显示,铁的端帽可以显著提高低能线圈的表现,就像我计划做的这样。高能的电磁枪会使端帽磁化饱和,让端帽的效能提升作用变得不明显。
![image024.jpg]()
To determine the
usefulness of end caps to the CG-42 project, I’ll make a rough comparison of
magnetic field strength between my coil and the one used in the research.
The research setup involved a coil of 40mΩ and 23uH, and a 33,000uF capacitor
bank charged up to 60V. This would result in an average discharge current
of 472A. The equation for magnetic field strength at the center of an
ideal coil is B=μ0*N*I/L where μ0 is the magnetic
constant of 1.257×10⁻⁶ T*m/A, N is number
of turns, I is current and L is length of the coil. The research coil had
70 turns and was 27mm long. This results in an average field strength of 1.54
Teslas. The same equation applied to the CG-42 coil gives an
average field strength of 1.23 Teslas.
If the research coil of higher field strength gained a significant
performance boost from the end caps, then I should also be able to see a
similar performance boost if I build end caps of similar composition.
为了确认磁性端帽对CG-42项目的作用,在我的线圈和研究中所用的线圈之间,我做了一组磁场强度的对比。研究使用的是一个40mΩ
and 23uH的线圈,一个33,000uF的电容充到60V。这可以产生平均472A的放电电流,(计算过程略),产生平均 1.54
Teslas.的磁场强度,CG-42的磁场强度是1.23
Teslas,所以如果研究中的端帽起明显作用,我这个项目中的端帽也会有明显的作用。
Coil
Triggering
线圈触发
It’s
important to have feedback when switching the coils in a multistaged
coilgun. If the switching mechanism isn’t adaptive, a small irregularity
in one stage introduces a timing error that amplifies in subsequent
stages. As the batteries drain with repeated shots and as the coils
heat up, the coils will carry less current and produce less acceleration.
Thus a timing sequence that is optimized for room temperature coils and a fresh
battery will not work well for hot coils or a partially drained battery.
The timing of the coils must adapt actively to all possible situations.
对多级电磁枪而言,线圈开关有反馈是很重要的。如果开关机理不合适,一级触发时间的小误差在次级就会被放大。当电池组被反复射击耗尽时,当线圈发热时,线圈电流会降低,加速效能会降低。所以一个为室温和足电设计的触发时序,并不适合发热的线圈和即将耗尽的电池。触发时序必须适合所有可能的条件。
![image025.jpg]()
Accomplishing this is easier than it sounds.
A simple IR sensor can be placed at the entrance of each coil, such that the
projectile blocks the sensor as it enters the coil, and clears the sensor as
the projectile aligns with the center of the coil (if projectile and coil are
the same length). A circuit can trigger the coil as long as the sensor is
blocked. This results in near-perfect timing, every time. This implemented for
the CG-42 with a simple circuit that only uses a small handful of analog
components.
解决这一问题并没有听起来那么难。简单的红外线传感器布置在每一级线圈的入口处,这样当弹丸进入线圈时就会(遮挡)触发传感器。当弹丸到达线圈中点时,就会(不遮挡)复位传感器(前提是线圈与弹丸等长)。当传感器遮挡,电路会触发线圈。这就是接近完美的触发时序。这个机理给CG-42提供了一种简单的电路,只需用一些手工可制作的模拟元器件。
Projectile
Feed System
供弹机构
The
only moving parts required for this design are in the mechanism that feeds
projectiles into the coils. The simplest approach I could think of was to store
the projectiles in a spring-loaded box magazine (like a typical automatic
weapon) and punch the projectiles out of the magazine at the top via an
off-the-shelf “injector” solenoid. The solenoid is spring-loaded, so it
pulls itself back to the starting position after being fired to allow another
projectile in the magazine to slide up for the next shot. Most coilguns that
use a solenoid feed mechanism place the solenoid immediately behind the magazine.
However, that eats up precious length that could otherwise be occupied by more
coils, so I chose to place the solenoid above the magazine and equip it with a
small “arm” that reaches down to push the projectiles out of the magazine.
在本设计中,仅有供弹机构是运动部件。能想到的最简单的方案就是弹簧弹夹(就像常用的自动武器一样),用成品电磁推拉器作为将弹丸推出的撞针。电磁推拉器有弹簧复位装置,在击出一发弹丸之后,可以自动复位待击下一发。大部分电磁枪所使用的电磁推拉器供弹机构都是直接布置在弹夹的后面。但是这种布局将侵占宝贵的长度,原本可以布局更多的加速线圈。所以我选择在弹夹的上方布置电磁推拉机构,安装了一个小摇臂伸下来推动弹丸射出弹夹。
![image026.jpg]()
After
the mechanical design was completed, I designed a circuit that controls the
injector and allows the user to chose semi or full-auto mode. The circuit
also sets the maximum rate-of-fire, and reads a signal from the 8th stage
trigger to ensure that only one shot is fired at a time.
供弹机构机械结构设计完成之后,我又设计了一套控制电路,让用户可以选择单发或自动射击。控制电路设定了最大射速,并且能够检测8级加速线圈每一级的激发,同一时间只有一颗弹丸在加速状态。
Power
Supply:
供电
The triggering and injector control
circuitry require a low, stable voltage to operate properly. The 25V available
from the battery packs is too much, so the power supply must step-down the
battery voltage to something more usable. There are two options to
perform a DC step-down. The first is a linear regulator- a cheap, simple
device that shunts the unused voltage as waste heat, which is wasteful with
high step-down ratios. The second option is a buck converter, an
Integrated Circuit (IC) that drives an inductor and a diode to reduce the
voltage. I made the decision that the improved efficiency was worth it,
and designed two buck converters- one to power the control circuitry and a
second to power a targeting laser.
放电激发控制电路和供弹电路需要低电压、稳定的电压。电源组的25V有效电压太高了,所以电源必须对电池进行降压才能方便使用。直流降压有两种选择,第一种是线性稳压器,一种廉价简单的设备,直接把高压降到低压是不必要的部分当做热量损失掉,者种方案当压降比率较大时浪费很大。第二种选择是用变压器,用电感和二级管组成的降压集成电路。我觉得,效率提升更重要,所以设计了双变压器方案,一个给供弹机构控制电路供电,另一个给放电激发控制的激光供电。
Also, LiPo batteries can be damaged if
drained below 3V per cell (or ~18V total for a 6 cell pack), so a low-voltage
detector for each battery was designed into the power supply. It’s a
simple circuit that lights a red LED when the battery drops below 18V.
Lastly, two green LEDs were added to the
power supply to serve as indicators, one lights when the buck converter is
switched on enabling the control circuitry, and another lights when the
high-side battery is plugged in and the coils become powered.
而且,如果每个电池单元的电压消耗到3V以下(6组就是总电压18V以下),锂离子电池就会损坏,所以给每个电池都设计了低压保护装置,用了一个简单的电路当电池电压降到18V以下,红色的LED灯就会亮起。
最后,设计了两个绿色LED灯作为电源指示,其中一个当变压器启动控制电路的时候亮起,另一个是当高压的电池接入线圈待机时亮起。
Gun Frame
The frame of the gun should be strong,
lightweight, compact and easy to build. Minimizing the number of parts,
cuts, and bends in the design will save days of effort and frustration when it
comes time to build it. I designed the frame of the CG-42 to be built
with inexpensive, readily available aluminum bars and sheets joined together
with machine screws and epoxy. For the aluminum sheets, I chose alloy
3003 because of its formability and machineability. I’m working entirely with
hand tools so I needed to use an alloy that was easy to cut, drill, and bend by
hand.
枪的框架应该是坚固、轻盈、简洁紧凑并且易于制造。在设计中尽量减少部件、切割与弯曲,可以减小在制造阶段工作或失败风险所花的时间。我决定设计CG-42的框架使用便宜的、现成的铝条和铝板,用螺丝和环氧胶来连接。铝条我选择3003合金,基于它的可塑性及机械强度。因为全部是手工作业,所以需要一款容易手动切割、钻眼儿和弯曲的铝合金。
The only high-voltage parts in the whole
design are the IGBTs, which can reach up to 600V when fired. I chose to
group all of the IGBTs and switching electronics together inside an ABS plastic
compartment along the top of the gun to improve the electrical safety of the
design. The connections between the batteries and the coils were designed
with thick, tightly connected conductors to minimize parasitic impedance that
reduces power transmission from batteries to coils. I chose copper bus
bars to conduct current to the coils and super-low gauge copper automotive wire
to connect the batteries to the bus bars.
唯一的高压部件是在开火是能达到600V的IGBT。将所有的IGBT和光电开关等电子部件都集中到一个ABS工程塑料仓中,布置在枪体的上方,这样设计能提高电力安全性。在电池组和线圈之间,使用粗的、坚固的优质导体,来最小化额外的阻抗,减小电源到线圈的能量传递损失。选择铜总线向线圈输送电流,现在超级低标号的汽车用铜线连接电池组与总线。
The look of whole design started with a
simple sketch which then became a scale drawing. Then the design was
adjusted and components were rearranged again and again until everything fit
inside.
在精密绘图之前,先用简单的草绘开启整个设计。然后在一遍又一遍的调整部件的安排直到每个单元都能在内部安排合适。
![image027.jpg]()
Original Sketch of CG-42
Concept (June 2011).
图中关键词:免充电设计;无电容;20V300AIGBTs
10组,12V调压,IGBT驱动 10组,光电开关 10组,
![image028.png]()
Construction
组建
End Caps
端帽
The first components to be constructed
were the magnetic coil end caps. Mixing and molding the iron-epoxy
compound was challenging to say the least. The mixture ratio has to be
just right. If there’s too much epoxy, the end cap won’t be ferrous
enough and might as well be a chunk of plastic. If there’s too much iron,
the piece will conduct eddy currents and possibly crack when coming out of the
mold. Also, the right amount of compression has to be applied to the
mold- too much compression will cause the epoxy to ooze out, leaving an overly
iron-rich piece inside. I had to make 16 end caps to get 9 that were
good- meaning I had a 56% success rate with this process. Each piece took
48 hours to dry, making the effort long and frustrating. Lastly, the end
caps were fitted with brackets to mount the infrared projectile sensors and
coil magnet wire.
第一个构件是磁性的线圈端头帽。混合和浇筑环氧胶铁粉混合物是非常大的挑战,不像说说那么简单。混合比例必须得调正确。如果环氧胶太多,则端帽的磁性不够,就变成纯塑料。如果铁粉太多,则可能产生电流涡流,并且浇筑出来太脆。浇筑的压缩率应用也必须考虑,压缩的太多,会溢出太多的环氧胶,使过多的铁沫析出在里面。我不得不做了16个,才得到9个可用的,也就是说我这个工艺的成功率为56%。每片都要花48小时干燥,这让工作变得漫长枯燥。最后在端帽上加装拱眉,用来安装红外线弹丸探测器和线圈线。
![image031.jpg]()
![image033.jpg]()
![image035.jpg]()
Coils
线圈
After
the end caps were completed, they were positioned along the barrel and holes
were drilled so the IR detector beams could shine across the barrel. Then
the coils were wound carefully in between the end caps with the aid of my vice
grip. Each inner coil layer is secured with a single layer of packing
tape.
端帽做好了之后,都布置到枪管之上,并且钻好孔使得红外线二极管和传感器组透过枪管。然后将枪管固定在虎钳上,在端帽之间仔细的绕上线圈。线圈的每一层都用包裹带裹上加固。
>
![image036.jpg]()
![image038.jpg]()
![image040.jpg]() Projectiles
弹丸
An
Projectiles
弹丸
An
advantage to using steel nails as projectiles is the ease of fabrication, which
is a huge plus when you need to make twenty of them. Each projectile was
simply measured, cut, and filed into shape. Maintaining a precise length
was important to insure that each projectile extends far enough to trip the
first stage IR trigger when pushed out of the magazine.用钢钉制作弹丸的一个好处就是易于加工,当你要做很多枚的时候,这就非常重要了。每颗弹丸仅需简单的测量长度、切割、用锉刀磨尖就可以了。确保每颗弹丸的长度精确很重要,在弹丸被弹出弹夹的时候,长度足够触发第一级的红外光电开关。
![image042.jpg]()
Initial
Testing
基础测试
It’s a good idea to make sure everything
works before you expend a ton of effort refining it into a final product.
I built a plywood testbed upon which I could easily lay out all of the
components of the gun for testing. I cut two copper bus bars and connected
the coils to the batteries in a similar manner as the final product in
order to have an accurate test. The power supply and switching circuits
were built on breadboards, and everything was connected together in a way that
made it easy to take apart again to make changes and repairs. I also
purchased a Chrony F-1 speed trap for measuring the speed of the projectiles in
order to compare the actual performance to what I had designed for.在你做大量工作制作成品之前,确保每一个部件都好用是很重要的。我搭建了一个可以把电磁炮所有部件都安装上的试验床(胶合板材质)。我做了两条铜总线,用来连接电池组与线圈,与成品的形式一样,可以得到最接近的结果。电源供给和开关电路用面包板建立,所有的部件都是易拆连接,可以方便的取下更换或调整。我还建立一组“Chrony F-1”测速器来测量弹丸速度,来印证我的设计。
![image044.jpg]()
![image045.jpg]()
![image046.jpg]()
The
first test shot was fired on January 27th, 2012
with a single stage and single battery, since I had never built something like
this before and wasn’t really sure of what would happen. You can watch a
video of the very first test shot below.
The remaining stages were then
added to the testbed and fired. Initial test results for the first seven
stages are given in the table below:
第一次测试发射于2012年1月27日,使用了单级加速和单块电池,开天辟地第一次不知道会发生什么。接下来将剩下的多级加速单元添加到试验床上。前7级的基础试验结果如下: 在你做大量工作制作成品之前,确保每一个部件都好用是很重要的。我搭建了一个可以把电磁炮所有部件都安装上的试验床(胶合板材质)。我做了两条铜总线,用来连接电池组与线圈,与成品的形式一样,可以得到最接近的结果。电源供给和开关电路用面包板建立,所有的部件都是易拆连接,可以方便的取下更换或调整。我还建立一组“Chrony F-1”测速器来测量弹丸速度,来印证我的设计。
![image047.png]()
Total efficiency
(n) is defined as the percentage of energy removed from the batteries that
becomes projectile kinetic energy (KE/PE*100%). The cumulative total
efficiency is about 5.9%. The 8th stage wasn’t fired
because part of it exploded during testing. Clearly there were issues to
be worked out before the electronics could be put into a handheld gun,
but I had enough data to show that the 10J muzzle energy goal was well within
reach.
总效率的定义是弹丸的动能增量与电池能量消耗的比值。累计总效率为5.9%。第八级没有开火是因为试验中有部件爆了。虽然很明显将这些电子部件装到一只手持电磁枪体中还要做很多工作,但试验数据告诉我们出口动能10J肯定没问题。
Switching Assembly
开关模块
Next
I built the plastic housing for all of the high voltage components used to
switch the coils on and off. Two thick copper bus bars connected to the
battery terminals run the length of the housing down either side. Between
the copper rails are the eight IGBTs, one to switch each coil. Between
each IGBT is a small circuit board containing the voltage suppression
electronics. Initially, each voltage suppression circuit board contained
four series diodes, which I mistakenly thought was the fastest way to quench
the coil current. Later, I learned that the single diode/resistor method
was much faster, so each circuit board was removed and upgraded. Lastly,
each stage has a red LED that lights when the IGBT is conducting. This
provides a fault indicator if a coil is erroneously switched on as well as a
cool “racing LED” effect during each shot.接下来制作塑料仓用来收纳所有的线圈高压开关部件。两根厚的铜总线沿着长度方向布置在塑料仓底两边。在两条铜轨的中间,布置8个IGBT,每个控制一个线圈的开关。在每个IGBT中间,都有一个小的电路板,电路板包含电压抑制电路。第一开始我每个电路板上弄了四个二极管,我错误的以为这是最快的抑制电压方法。后来,我知道单一的二极管电阻方法更快,所以每个线路板有弄下来升级了一下。最后,每级有一个红色的LED灯,当IGBT导通的时候点亮。这组LED可以作为故障指示灯,指示线圈非正常导通。同时这组LED灯还非常酷,作为开火时候的轨迹灯。
![image048.jpg]()
![image049.jpg]()
![image050.jpg]()
![image051.jpg]()
![image053.jpg]()
![image054.jpg]()
Frame
框架
The
gun frame had to be built twice. The first attempt was based on a design
that just couldn’t be built with hand tools, so I redesigned it to use
pre-existing aluminum cross-sections to minimize parts, cuts and joints.
The second design was stronger and easier to build, but several parts still had
to be redone once, twice, and even three times until I had something that was
solid and respectable. By the time the aluminum frame was complete and
ready to accept the gun components, I had probably ingested more aluminum
sawdust than a healthy human being ever should, but it was worth it. The
final product is extremely rigid and sturdy, with no rattles or creaking even
when tested under heavy loads (such as when I accidentally ran into it
head-first while vacuuming the floor one day).
枪的框架不得已造了两次。第一次尝试的设计方案无法用手动工具造出来,所以我重新设计了一下,使用现成的铝型材和连接件,来最小化、切割、连接。第二版更坚固并且更容易制作。但是一些部件还是得再三返工,直到足够坚固并适合承载枪支的部件,我可能吸入了正常人一辈子吸入的铝材粉末。最终产品强度刚性十足,即使在超负荷测试时也不会吱吱嘎嘎作响(比如有一天从头顶那么高扔到地板上)。
![image055.jpg]()
Lots of additional components were
built into the frame. The pistol-grip and trigger are hugely improved
from the CG-33. The ergonomic grip is solidly bolted into the frame, and
the trigger pulls smoothly and comes to a confident stop just as the shot is
triggered. The select fire switch, power switches, battery monitor LEDs,
circuit board mounting brackets, safety fuses and a targeting laser were all
designed, built, redesigned and rebuilt and mounted into the frame during this
phase as well.
在框架内会添加许多部件。枪把和扳机都比CG-33大大的改进了拿了过来。人机工学把手用螺丝固定到了框架上。扳机手感平滑,射击时限位行程令人满意。火力模式开关,电源开关,电池指示灯,线路板支架,保险和激光瞄准器都设计好了,反复调试安装都装好了。
![image056.jpg]()
![image057.jpg]()
![image058.jpg]()
![image059.jpg]()
![image060.jpg]()
![image061.jpg]()
![image062.jpg]()
![image063.jpg]()
![image064.jpg]()
Circuit Boards
线路板
A
circuit that makes perfect sense on paper won’t work when you simulate it, and
a circuit that works perfectly in a simulator won’t work when you test it on a
breadboard, and a circuit that works perfectly on a breadboard won’t work once
you solder it together. Then you spend three weeks troubleshooting it,
only to find that it starts working again for no reason at all. Thus went
the process for the CG-42′s circuit boards.
一个线路在图纸上表现良好但模拟仿真不一定好用,模拟仿真好用不一定真正建在面包板上就好用。当你折腾三周找不到故障,不知道什么原因突然又好用了。CG-42电路板就是这样造出来的。
In
the end, everything worked out. The layouts of all the circuit boards
were sketched on paper before-hand to fit into their small spaces while
remaining neat and organized. Cramped, messy circuit boards make it easy
for shorts and loose connections to occur. When your circuits are
connected to two giant flammable batteries that you hold right next to your
face when you shoot the gun, that’s some pretty serious business.
最后都造出来了。所有线路布局之前都用手草绘出来,放到他们狭小的空间内仍然井井有条。扎好的线路板使得用短的松的连接线很好辨认的走线。当线路把两个巨大的可燃的电池(射击时就在你脸旁边),是件非常严肃认真的事。
![image065.jpg]()
Projectile Feed System
供弹机构
This
was a challenge to build, as moving parts usually are. For the coilgun to
operate reliably, the projectile feed system will have to operate smoothly and
consistently even when actuated 10 times per second. The difficulty began
with the magazine. Two magazines, three followers and four magazine springs
were designed, built, and failed before I came to a good design that could feed
the projectiles without jamming.
活动机构通常比较难造,供弹机构就是个挑战。为了电磁枪操作可靠,供弹机构必须操作平顺即使在每秒十发的高射速下。困难从造弹夹开始,在我做到设计制作一只不卡弹的弹夹之前,做废了2个弹夹,3个移动件,4个弹簧。
p; When your circuits are
connected to two giant flammable batteries that you hold right next to your
face when you shoot the gun, that’s some pretty serious business.
最后都造出来了。所有线路布局之前都用手草绘出来,放到他们狭小的空间内仍然井井有条。扎好的线路板使得用短的松的连接线很好辨认的走线。当线路把两个巨大的可燃的电池(射击时就在你脸旁边),是件非常严肃认真的事。
![image066.jpg]()
The
final magazine is built from bended aluminum sheets joined with epoxy,
and the spring was manually bent from steel wire. Instead of using a
mechanical latch, the magazine is held in place by a Neodymium magnet.
最终的单价是由环氧胶粘起来的弯曲铝片构成,弹簧是由不锈钢丝手工弯成的。用一个磁铁取代了弹夹卡笋。
The
injector solenoid required some modification to get it to function
properly. The stock return spring didn’t provide enough force to retract
the solenoid to its starting position when subjected to friction against the
spring-loaded projectiles. Using two stock springs provided enough force,
but the action was mushy and inconsistent. Using a trick from freshman
physics lab, I measured the spring’s force constant and purchased a new single
spring that provided double the force. This fed the projectiles much more
reliably. After some time spent adjusting the positioning and
stroke-length of the solenoid, I finally had a mechanism capable of sustaining
full-auto projectile feed.
弹丸弹射机为了实现功能得做一些改进。电磁推拉器的复位弹簧没有足够的力量回位,当弹夹弹簧的压力会增加摩擦力。用两只复位弹簧可以提供足够的力量,但是动作软弱不可控。用一个初级物理实验室提供的方案,我测量了弹簧的力量并买了一只能够提供双倍力量的单簧。这样供弹就可靠了。花了一些时间调整位置和螺线管长度,我最后得到了一个可靠的连击供弹装置。
??,做废了
2个弹夹,3个移动件,4个弹簧。
p; When your circuits are
connected to two giant flammable batteries that you hold right next to your
face when you shoot the gun, that’s some pretty serious business.
最后都造出来了。所有线路布局之前都用手草绘出来,放到他们狭小的空间内仍然井井有条。扎好的线路板使得用短的松的连接线很好辨认的走线。当线路把两个巨大的可燃的电池(射击时就在你脸旁边),是件非常严肃认真的事。
![image067.jpg]()
![image068.jpg]()
![image069.jpg]()
![image070.jpg]()
![image071.jpg]()
![image072.jpg]()
Final Testing
最终测试
After
many months spent connecting all of the components together and troubleshooting
all sorts of problems, the whole coilgun was assembled and ready to go.
The first full-power test shots were fired on July 1st, 2013. The first
shot was a success. Immediately after the second shot, the IGBT
controlling the first stage failed dead-short and exploded. The battery
fuse failed to trip, allowing the first stage coil to melt and burn quite
thoroughly. The entire incident can be observed below:
花了好几个月把所有部件组装起来并且解决了一大堆问题,整只电磁枪完成并可以使用了。第一次满电射击是与2013年7月1日完成。第一次射击成功了,刚打了第二发,控制第一级的IGBT短路烧毁。电池保险熔断失败,使得第一级线圈融化并彻底烧毁。整个过程下边这个视频可以看到。
After making this video I was
so amped up on science I couldn’t sleep until two in the morningFortunately, the circuit board fuses worked properly and protected
the rest of the components. The cause of IGBT failure was later
determined to be excessive voltage allowed by a blown resistor in the voltage
suppression circuit. The first stage coil had to be replaced, and all eight
voltage suppressors were refitted with higher wattage resistors to widen the
safety margin. Thanks to requirement 4 (maintainability) the repairs were
quick and the gun was back up and running in less than two weeks. The results
of the full performance characterization are shown below.
幸运的是,线路板的保险起了作用,保护了其余的部件。事后发现,IGBT烧毁是因为超压,超压是由于抑制电压电路中的一只电阻损坏引起的。第一级线圈必须得重做,所有8只电压抑制系统的参数需要重新调整提高高压抑制性能来获得更宽的安全范围。得益于易拆卸的结构设计,两周时间就重新修好。完美的表现结构记录在下面:
![image073.png]()
With
a total efficiency of 7.0% the results are extremely pleasing (compared to a
typical 2% coilgun). As expected, performance had improved since initial
testing. This is due to the resistors that I added to the voltage
suppression circuits to quench the coil current more quickly. This drastically
reduces suck-back, especially in later stages where the projectile is moving
very fast. The efficiency of the first and last coils dropped (relative
to the other stages), likely due to induction of eddy currents in the aluminum
gun frame which the first and last coils are now mounted into. As to what
causes the performance drop on the 6th stage, I have no theories. Oddly,
looking back at the initial test with 7 stages, the 3rd-to-last stage performed
low as well.
7%的总效率确实令人高兴(通常电磁枪只有2%)。不出所料,比最初测试的时候还有进步。这是因为我在电压抑制线路中增加了一个电阻器,可以更快的抑制线圈电流。这显著的降低了反拉力,特别是在后几级中弹丸速度很快的情况下。第一级和最后一级效率较低,很可能是由于在铝框架上产生的涡流电流的影响。第六级为何效率低,我还没有找出原因。奇怪的是,在7级测试的时候,也是倒数第三级效率低。
Completion
完工
After
an eternity of sawing, filing, drilling and soldering I suddenly realized that
there was nothing left to be done and the gun was finished. Somehow
everything turned out better than I expected, from the appearance of the gun to
the performance numbers. All of the goals were met, except rate of fire
which came in at 7.7 rounds/sec. This could be increased by changing a
single resistor, but I chose to keep it this way since the coils won’t heat up
as quickly.
经历了无数的锯、锉、钻和焊,我突然发现没剩下什么可做的了,枪完工了。而且,一切比我预期的还要好,无论是颜值还是表现的数据。所有的设计目的都达到了,除了设速,只有7.7发每秒。这换一个电阻就能改变,但我没有改,因为现在这样线圈不会过快的发热。
The
battery powered coilgun equation was remarkably accurate in determining the
power required. This is because the actual acceleration of the projectile
was very close to being constant, which was the key assumption of that
equation. The efficiency guess (6-10%) was also fairly close.
However, the 40mΩ series resistance prediction was way off- actual series
resistance was closer to 100mΩ due to unexpectedly high internal resistance
within the battery cells. The coils only get about 190A instead of the
300A I planned for, but since the 300A was way over-designed, the coils still
get enough current to meet the projectile power demands. This means I
could have gotten away with using the smaller 2500mAh batteries, but the bigger
batteries provide the advantage of being able to power far more shots. While
testing and making the video, I put about 100 rounds through the gun and the
batteries only dropped from 50.20 to 49.03V. I could probably fire
several hundred more rounds before the batteries drain to the minimum 36V and
need a recharge.
电池驱动电磁枪公式很精确的达到了能量需求。这时因为实际的弹丸加速非常接近恒定,这是公式的关键假设条件。6%-10%的效率预判也非常贴切。但是40毫欧的系统电阻的预设与实际的相差较多,实际是接近100毫欧,主要是没想到电池组的内阻这么高。线圈电流只有190A而不是原来计划的300A,但300A指标是有设计余量的,所以线圈仍然能满足弹丸的加速需求。也就是说,我可以用小一点的2500mAH的电池组,但是大一点电池组可以提供多的多的射击机次数。当测试和录视频的时候,我打了100发,而电池组电压仅仅从50.2V降到49.03V,在到达36V的最低电压需要充电之前,我应该能够打上几百发。
In
the end, I’m very happy with how it turned out. Holding the gun makes you
feel like a mad scientist, and firing full-auto bursts gives the shooter a
terrifying sense of excitement and destructive power. Project complete!
最后,把它造出来的过程我很开心。拿着这支枪感觉自己像一个疯狂的科学家,扫射的时候给人一种恐怖的令人兴奋的破坏力。项目完成啦!
![image008.jpg]()
![image009.jpg]()
![image010.jpg]()
![image029.jpg]()
![image032.jpg]()
![image034.jpg]()
![image037.jpg]()
![image039.jpg]()
![image041.jpg]()
![image043.jpg]()
![image052.jpg]()


200字以内,仅用于支线交流,主线讨论请采用回复功能。